Last Updated on January 1, 2025
- Select the right doll and cake base, ensuring stability and the perfect size.
- Bake even, sturdy cake layers and cool completely before assembling.
- Insert and secure the doll, then apply a crumb coat and refrigerate.
- Decorate creatively using buttercream or fondant, and personalize for unique themes.
Have you ever seen a cake so enchanting that it feels like stepping into a fairytale? Doll cakes have this magical effect, turning any celebration into a memorable event. These cakes, with their charming designs and intricate details, are perfect for birthdays, baby showers, and themed parties. Whether you’re a baking enthusiast or a beginner, creating a stunning doll cake is within your reach. In this guide, we’ll walk you through every step to make your own beautiful doll cake that will impress guests of all ages.
Choosing the Right Doll and Cake Base
The first step to creating a doll cake is selecting the right doll and cake base. The type of doll you choose can significantly impact the final look of your cake. Traditional Barbie dolls are a popular choice due to their size and the ease with which you can dress them up with cake. However, you can use any doll that fits your theme and cake size.
Next, consider the cake base. Think about flavors, shapes, and sizes. Classic flavors like vanilla, chocolate, and red velvet are always a hit, but you can experiment with other flavors like lemon, carrot, or even a funfetti cake for added surprise. The shape and size depend on how many people you want to serve. A standard round cake is a great starting point, but you can also use square or rectangular pans to create a larger base.
Before you start baking, ensure you have a stable base. Place a cake board under the first layer to make handling easier. This also prevents any structural issues when you start stacking the layers.
Baking the Perfect Cake Layers
Baking perfect cake layers is crucial for a stable and beautiful doll cake. Use high-quality ingredients and follow your recipe closely for the best results. Here are some tips to ensure even and sturdy cake layers:
- Use Room Temperature Ingredients: This helps in achieving a smooth batter, resulting in evenly baked layers.
- Measure Ingredients Accurately: Baking is a science, so precision matters. Use a kitchen scale for the most accurate measurements.
- Don’t Overmix the Batter: Overmixing can cause the cake to be dense. Mix until just combined for a light and fluffy texture.
- Bake at the Right Temperature: Preheat your oven and bake at the temperature specified in your recipe. Avoid opening the oven door frequently to maintain a consistent temperature.
Once baked, allow the layers to cool completely on a wire rack. Level the tops of each layer with a serrated knife or a cake leveler to ensure they stack evenly.
Assembling the Doll Cake
Now comes the exciting part—assembling your doll cake. Start by placing the first layer on your cake board or serving platter. Spread a layer of frosting on top, then add the next layer. Continue stacking and frosting until all layers are used.
Next, you’ll insert the doll. If your doll is too tall, you may need to trim its legs or use a smaller doll. Wrap the doll’s lower half in plastic wrap to keep it clean. Gently insert the doll into the center of the cake. If needed, carve out a small hole in the top layer to fit the doll securely.
Ensure the doll is stable and stands upright. Use a bit of frosting to secure it if necessary. Now, apply a crumb coat—a thin layer of frosting—to seal in crumbs. Refrigerate the cake for 15-30 minutes to set the crumb coat.
Decorating Techniques
Decorating is where your creativity can shine. You can use buttercream, fondant, or a combination of both to dress up your doll cake. Here are some techniques to consider:
- Buttercream Ruffles: Use a petal tip to pipe ruffles around the cake, creating a dress-like effect. Start at the bottom and work your way up.
- Fondant Drapes: Roll out fondant and cut it into strips. Drape the strips over the cake to mimic the folds of a dress.
- Textured Icing: Use different piping tips to add texture and patterns to the dress. Star tips, rosettes, and basketweave patterns are all great options.
Add details like flowers, ruffles, and accessories to enhance the design. Use edible glitter, pearls, and food coloring to make the dress pop. Personalize the cake to match the theme of your event.
Creative Ideas and Inspirations
The possibilities for doll cakes are endless. Here are some unique themes and designs to inspire you:
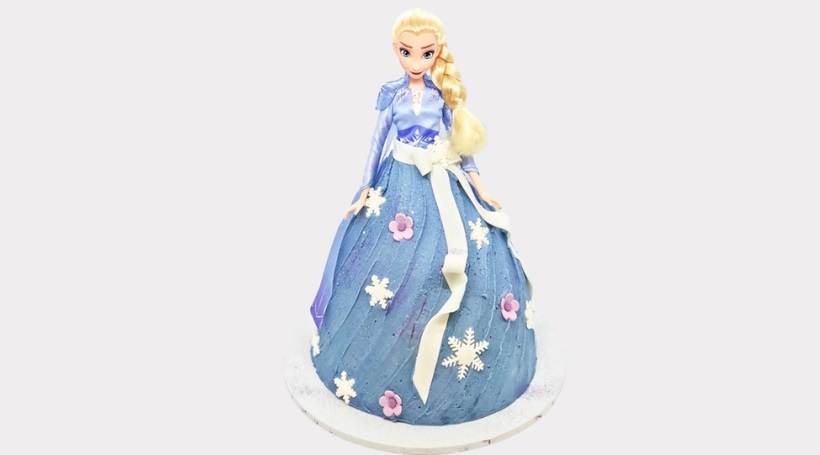
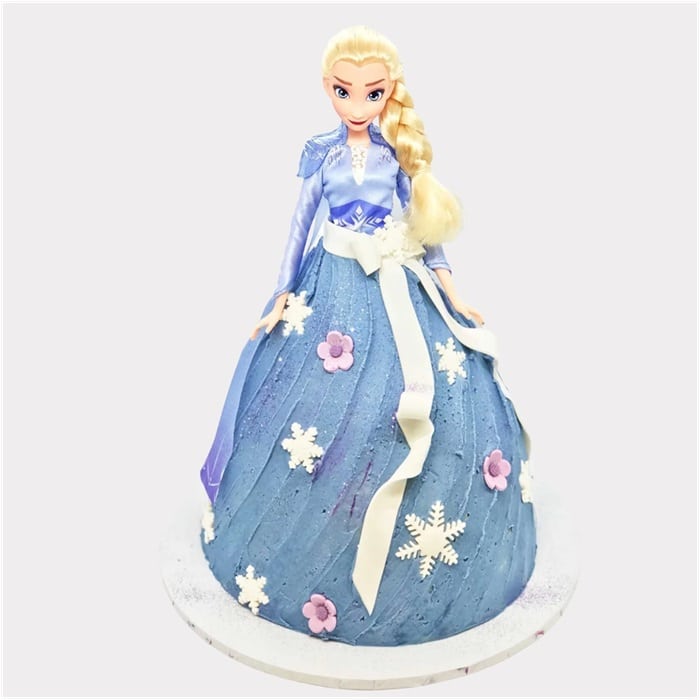
- Princess Doll Cake: Create a royal gown with lots of ruffles and glitter. Add a tiara to complete the look.
- Fairy Doll Cake: Use pastel colors and edible flowers to create a whimsical fairy dress.
- Superhero Doll Cake: Decorate the cake with superhero logos and colors for a powerful and fun design.
- Holiday-Themed Doll Cake: Customize your doll cake for holidays like Christmas, Halloween, or Easter with themed colors and decorations.
Troubleshooting Common Issues
Even experienced bakers encounter challenges. Here are some common issues and how to fix them:
- Uneven Layers: Use a cake leveler or serrated knife to trim each layer for a smooth stack.
- Crumbly Cake: Ensure your cake is fully cooled before assembling. A crumb coat helps to seal in crumbs.
- Leaning Doll: Use dowels or straws inside the cake for additional support. Secure the doll with extra frosting if needed.
Remember, practice makes perfect. Each cake is a learning experience, so don’t be discouraged by minor mishaps.
Conclusion
Creating a stunning doll cake is a rewarding and fun process that brings joy to any celebration. By following these steps and letting your creativity flow, you can craft a cake that’s not only beautiful but also delicious. So, roll up your sleeves, gather your ingredients, and start baking your masterpiece. Don’t forget to share your creations and experiences—we’d love to see your amazing doll cakes!